Helika Unity SDK
Helika Unity SDK Docs
The Helika Unity SDK mirrors the functionalities of the Web SDK, catering specifically to Unity game developers. This integration facilitates the seamless inclusion of Helika services into your games. By incorporating the Helika Unity SDK, you gain effortless access to the complete range of Helika capabilities, empowering you to construct robust and scalable solutions with ease.
Features
- Streamline integration with Helika services
- Access to a wide range of Helika APIs
Current Version: 0.4.0
Installation
You can download the Helika.unitypackage from our github repository.
To install, open your Unity game in unity hub. Go to Assets->Import Package-> Custom Package , navigate to the folder where you stored the Helika.unitypackage file, and select it.
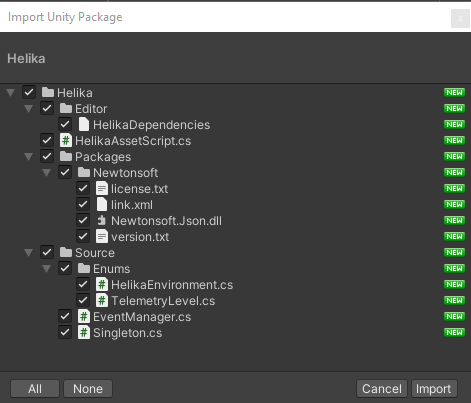
Feel free to exclude plugins (like Newtonsoft) that you don't need or is already in your project.
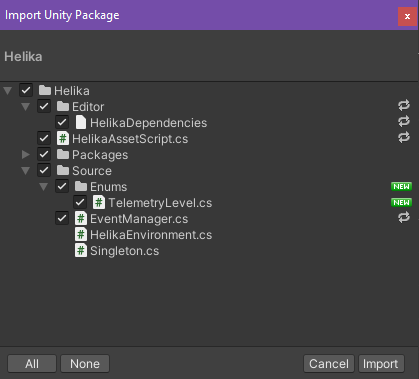
Upgrading your version
You can download the Helika.unitypackage from our github repository.
To upgrade the Helika SDK, open your Unity game in unity hub. Go to Assets->Import Package-> Custom Package , navigate to the folder where you stored the Helika.unitypackage file, and select it.
You can also drag and drop the downloaded unitypackage file in the Unity Editor.
Quick Start
You’ll need a Helika API Key in order to instantiate the Helika.EventManager. Please reach out to your Client Success Manager in order to receive an API key for your organization.
To instantiate an object, you can simply select an object in your scene and select Add Component in the Inspector.

Select the Helika Asset Script
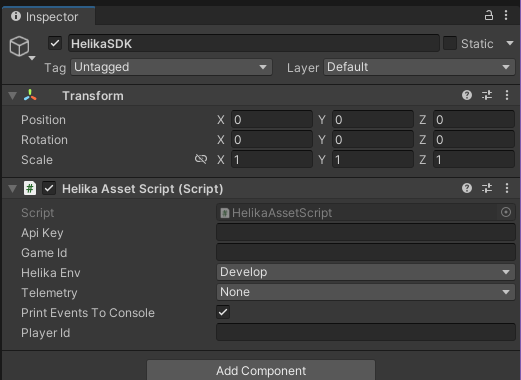
You'll need to set:
Api Key, please reach out to Helika Support to request an API key for your organization.Game IDwhich is simply an identifier and filter for the set of events from this gameHelika EnvtoLocalhost,Develop, orProductionTelemetrytoNone,TelemetryOnlyorAll
Optionally:
- Set
Print Events to Console(default:true) - Set
Player Id, which simply appends the specific player_id to all events. You can programatically add this at any time by callingEventManager.SetUserDetails()
The HelikaAssetScript is just a simple script to show you how to initialize the Event Manager and fire events.
Telemetry Level
Telemetry Level indicates the data that will be collected.
- None - No event is being sent to Helika. You would use this to test events locally. Make sure to have "Print Events To Console" checked
- TelemetryOnly - We will only collect event data. No evice information is collected. (UserDetails and AppDetails objects will still be appended)
- All - We will collect user and device information in addition to game events.
Note: When it's set toLocalhost, the helika events will only be printed in the Console. It will say whether the event is 'Sent' or 'Print Only'"
Programmatic Initialization
Here is a quick script to add somewhere in your initialization scripts.
// The EventManager is a singleton, so it only needs to be initalized once
// at the start of the game. Every subsequent use of the EventManager can simply
// use the EventManager.Instance
void Start()
{
  eventManager = EventManager.Instance;
  eventManager.SetUserDetails(
    new JObject(
      new JProperty("user_id", playerId),
      new JProperty("email", "[email protected]"),
      new JProperty("wallet", "0x8540507642419A0A8Af94Ba127F175dA090B58B0")
    )
  );
  eventManager.SetAppDetails(
    new JObject(
      new JProperty("platform_id", "Android"),
      new JProperty("client_app_version", "0.0.1"),
      new JProperty("server_app_version", null),
      new JProperty("store_id", "EpicGames"),
      new JProperty("source_id", null)
    )
  );
  eventManager.Init(apiKey, gameId, HelikaEnvironment.Develop, TelemetryLevel.All, false);
}
The EventManager is a singleton so it only needs to be initialized once at the start of the game.
Any data in the UserDetails and AppDetails is appended to events sent. UserDetails will only be added to events sent using EventManager.SendUserEvent(), but AppDetails will be appended to both EventManager.SendEvent() and EventManager.SendUserEvent() and its variations.
You can set UserDetails and AppDetails by calling eventManager.SetUserDetials() and eventManager.SetAppDetails() any time you need to make changes to these objects. They will replace the existing details object.
Updating the UserDetailsYou can reset the UserDetails by passing an object that contains
{"user_id": null}or an object that doesn't contain user_id:{"wallet_id":"0x..."}.When adding more info to the existing userDetails object, make sure you grab the existing UserDetails object first via
GetUserDetails(), then append your desired data, and then callSetUserDetails(object)e.g.
JObject userDetails = eventManager.GetUserDetails();
userDetails.Add("email", "[email protected]");
eventManager.SetUserDetails(userDetails);
You can reset the UserDetails by passing an object with "user_id" field set to null
// Log out user
eventManager.SetUserDetails(
  new JObject(
    new JProperty("user_id", null)
  )
);

// Clear and Reset User Details
JObject loginEvent = new JObject(
  new JProperty("event_type", "login"),
  new JProperty("event", new JObject(
    new JProperty("event_sub_type", "user_login"),
    new JProperty("event_details",
    	new JProperty("event_label", "game_login"),
    	new JProperty("event_action", "successful"),
		)
  )
);
eventManager.SendUserEvent(loginEvent);


// Set New User info
eventManager.SetUserDetails(
  new JObject(
    new JProperty("user_id", "new_player_id")
  )
);
// Clear and Reset User Details
JObject loginEvent = new JObject(
  new JProperty("event_type", "login"),
  new JProperty("event", new JObject(
    new JProperty("event_sub_type", "user_login"),
    new JProperty("event_details",
    	new JProperty("event_label", "game_login"),
    	new JProperty("event_action", "successful"),
		)
  )
);
eventManager.SendUserEvent(loginEvent);
Personal Identifiable Information (PII) Tracking
By default, PII Tracking is set to False on initialization unless you set the TelemetryLevel to All. You can opt to enable or disable PII Tracking by calling EventManager.SetPIITracking(true). When setting the PII Tracking to true, you can force it to send an event to log PII: EventManager.SetPIITracking(true, true);
var piiTracking = eventManager.GetPIITracking();
eventManager.SetPIITracking(!piiTracking, true);
Sending Events
Once the EventManager is initialized somewhere, you can simply call the EventManager.Instance.SendUserEvent() for user-specific events or await EventManager.Instance.SendEvent() for non user-specific events(s)
SendEvent() vs SendUserEvent()
SendEvent()andSendEvents()will not append user information set viaSetUserDetails()whereasSendUserEvent()andSendUserEvents()will append the user information.SendEvent()are used to send general events unrelated to users. Please make sure to use whichever is most appropriate.
There are several different ways to send an event, please use whichever is most applicable to your application.
Review the HelikaAssetScript.cs file to get assist in event sending procedures.
// This is an example of sending a single user event
JObject gameCompleteEvent = new JObject(
  new JProperty("event_type", "gameplay"),
  new JProperty("event", new JObject(
    new JProperty("event_sub_type", "game_complete"),
    new JProperty("event_details",
    	new JProperty("event_label", "single_player_mode"),
    	new JProperty("event_action", "completed"),
    	new JProperty("game_duration", 123),
		)
  )
);
eventManager.SendUserEvent(gameCompleteEvent);

// This is an example of sending multiple events at once
JObject evt1 = new JObject(
  new JProperty("event_type", "purchase"),
  new JProperty("event", new JObject(
    new JProperty("event_sub_type", "ingame_shop"),
    new JProperty("event_details",
    	new JProperty("event_label", "item_name_1"),
    	new JProperty("event_action", "completed"),
    	new JProperty("spend", 1.0),
		)
  )
);

JObject evt2 = new JObject(
  new JProperty("event_type", "purchase"),
  new JProperty("event", new JObject(
    new JProperty("event_sub_type", "ingame_shop"),
    new JProperty("event_details",
    	new JProperty("event_label", "item_name_2"),
    	new JProperty("event_action", "completed"),
    	new JProperty("spend", 2.0),
		)
  )
);
eventManager.SendUserEvents(new JArray() { evt1, evt2 });

// This is an example of a non-user event. For Non-user events, we don't automatically append user information
JObject gameCompleteEvent = new JObject(
  new JProperty("event_type", "gameplay"),
  new JProperty("event", new JObject(
    new JProperty("event_sub_type", "game_complete"),
    new JProperty("event_details",
    	new JProperty("event_label", "death_match"),
    	new JProperty("event_action", "completed"),
    	new JProperty("game_duration", 123),
		)
  )
);
eventManager.SendEvent(gameCompleteEvent);
API Reference
Conventions
HelikaEnvironment
public enum HelikaEnvironment
{
  Localhost,
  Develop,
  Production
}
TelemetryLevel
public enum TelemetryLevel
{
  None,
  TelemetryOnly,
  All
}
Game Event Taxonomy
For our event processors to effectively parse your events, they must adhere to a specific set of guidelines. Please see the Standard Analytics Metrics Event Type
Automatic Data Capture
The Helika SDK automatically appends selected data fields in the event along side your customized data event.
| Field | Type | Required/Optional | Description |
|---|---|---|---|
| game_id | string | required | The Game ID that we will use to identify your game's events (if set in the event itself, that overrides the default game_id set on initialization |
| created_at | DateTime | required | The timestamp when the event was created. |
| session_id | u4 | required | The sdk generates a new Session ID when the Helika Object is created. |
| event.user_details | object | required | The object that contains user specific information and appends it to the event. |
| event.app_details | object | required | This object contains app specific information like version and capabilities |
Methods
| Name | URL | Parameter | Description |
|---|---|---|---|
| Initializer | EventManager.Init() | apiKey: string gameId: string env: HelikaEnvironment enabled: boolean | Constructs the EventManager Instance |
| Instance | Instance | The singleton instance of the EventManager | |
| Get/Set User Details | EventManager.GetUserDetails() / EventManager.SetUserDetails | { "user_id": 1 } | Set User Details object that will get appended to all user events |
| Get/Set App Details | EventManager.GetAppDetails() / EventManager.SetAppDetails | Set App Details for the application that is appended to all events | |
| Send Single Event | EventManager.SendEvent() | eventName: JObject | Send a Single Event in JObject format |
| Send Multiple Instances of an Event | EventManager.SendEvents() | events: JObject[] | Send Instances of a single user event format |
| Send Single User Event | EventManager.SendUserEvent() | eveventName: JObject | Send a multiple Event in JObject format. |
| Send Multiple User Events | EventManager.SendUserEvents() | eventName: JObject[] | SSend Instances of a multiple user event format |
| Set PII Tracking | EventManager.SetPIITracking() |
| Sets whether or not we send PII Tracking data in the session create. |
Platforms
Requirements:
- Android API 16
- iOS Target 12.4
- Xcode 14.1
- Unity 2019.4
- Scripting Runtime 4.x Equivalent
Supported Platforms:
- Android
- iOS
- Linux
- MacOS
- WebGL
- Windows Desktop
- Windows Store (UWP)
- VR Hardware:
- Oculus Rift
- Oculus Quest
- HTC Vive
- Valve Index
Change Log
v.0.4.0
- Optimizations in the ingestion pipeline
v0.3.0
- Updated to Taxonomy 2.0
- Simplified Event Sending
- Removed Kochava dependencies.
v0.2.0
- Removed AsyncAwait library
- Added TelemetryLevel Enum
- Updated EventLogs
Updated 8 months ago